![]()
How to Refinish or Repair Your RV Roof

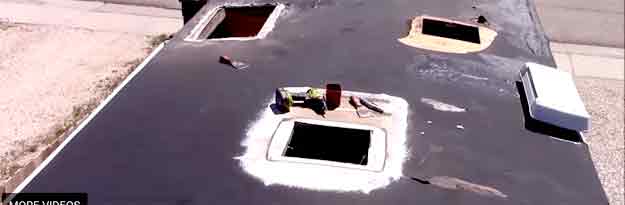
It is vitally important that the roof on your RV is solid and leak-proof. Inspect it in the spring when you de-winterize your rig. Look for bubbles, cracks, and areas where the outer coating has worn off.
Here are the products and methods I’ve used to refinish and repair the roof of my Class-C motor homes’ roof over the last twenty+ years.
Repairing or Refinishing Your RV’s Roof Isn’t Hard, But it Has To Be Done Just Right
Using the right products is essential. Having the right environment is as important.
- Place your RV under a shelter to keep it out of the hot sun and safe from rain.
- Work when the temperatures are within the range stated on the products you are using.
- Make sure the RV roof will remain clean and free of dust while the coatings are curing.
- Use the products shown below to create a new watertight roof.
There are Three Types of Common RV Roofing Materials
EPDM: Most common, needs refinishing every five to 10 years.
TPO (Thermoplastic Polyolefin): It’s cheaper and it’s already colored white. TPO sections can be welded together and they are highly resistant to punctures. TPO doesn’t last as long a EPDM but it does reflect the suns UV rays better. It also is resistant to mold and doesn’t accumulate dirt.
Fiberglass: Fiberglass roofing (shown in detail below) is super durable, but is heavier and more expensive than rubber roof membranes.
EPDM (Ethylene Propylene Diene Terpolymer)
EPDM is a black rubber membrane manufactured from recycled tires, slate dust, and sawdust. With care it can last up to 20 years. EPDM is fairly lightweight, can withstand the heat of the sun, and very resistant to scuffing and scratching. It can be easily patched and resealed with the correct materials. EPDM membranes need to be covered in a light-color finish to reflect sunlight and protect it from UV degradation. Unlike the aluminum roofing of an Airstream, this membrane has breathable qualities that lessen condensation problems.
Here are the steps to take to refinish or repair your RV roof
- Cover the sides of the RV with plastic sheeting. The cleaners you will use can damage the paint.
- Clean it. Use TSP (shown in the sidebar). Spray on using a garden sprayer. I also scrubbed with a stiff bristle brush. Then rinse off. Some guys use a power washer if it’s really dirty but I don’t want to take the risk of injecting water into the cracks and damaged areas. Let dry completely.
- Repair damaged areas and reseal using the products below. Now is also a good time to replace any damaged skylights or vents.
- Spray on the Cleaner/Activator Part 1 of the Dicor 2-part system and rinse off.
- Apply two coats of Dicor Acrylic Roof Coating.
Here are the right Dicor products to use to refinish or repair your RV roof

EPDM RUBBER ROOF REPAIR MEMBRANE
Repairs punctures, tears, and breaks in EPDM rubber, TPO plastic, metal, and fiberglass roofing. This easy-to-use peel and stick material is made of self-adhering EPDM rubber and conforms to most shapes and surfaces, yet remains flexible and strong. 12 Inch x 25 foot roll.

Dicor Self-Leveling Lap Sealant
Helps create a seal along a roof’s edges, around air vents, vent pipes, and screw heads. Compatible with any roofing material. Also offers excellent adhesion to aluminum, mortar, wood, vinyl, galvanized metal, and concrete. Improves the ability to continuously seal and remain flexible.

Dicor Non-Sag Lap Sealant
Helps create a watertight seal along a roof’s edges, air vents, vent pipes, and screw heads. Dicor Products’ Lap Sealant is a versatile sealant formulated for EPDM roofing but also compatible with most other roofing material, including Dicor Diflex II and Britek TPO roofing.
Continuously seals and remains flexible but does not flow after application.

Dicor Cleaner/Activator. Part 1 of the 2-part roof coating system
Two part, commercial grade system combines a cleaner/activator necessary for proper roof preparation and an acrylic coating that provides an excellent protective barrier for extending the life of the EPDM rubber membrane. Quick drying time. Part 1: cleaner/activator cleans and prepares EPDM roofing for maximum adhesion of acrylic coating. Spray on and rinse off thoroughly. Coverage rate of 1 qt. per 125 sq/ft.
USAGE: (1) Recommended Unit Preparation: EPDM CLEANER/ACTIVATOR is designed for use on rubber roofing surface only and may damage other exterior parts of RV. It is highly recommended that you secure plastic sheeting over entire sidewalls as well as front and rear end caps to protect them from possible damage. If EPDM CLEANER/ACTIVATOR contacts any surface other than roof, it should be rinsed immediately.
(2) Surface Preparation: Remove heavy deposits of dirt, leaves, pine needles and other debris using a broom or air blower. Any rocks, branches, or other large objects should also be removed. EPDM CLEANER/ACTIVATOR can be applied directly over EPDM surfaces containing residual amounts of dirt, dust and other contamination.

Dicor Acrylic Roof Coating Part 2 of the 2-part roof coating system.
The final step is to apply this coating. Read and follow the directions closely concerning safe application temperatures and dry time before rain. I recommend doing it under a roof to protect it from the elements.
Extend the life of your rubber roof! This acrylic coating provides an excellent waterproof protective barrier for extending the life of the EPDM rubber membrane on RV roofing. It also provides superior weatherability and UV resistance. Use with Dicor Rubber Roof Cleaner/Activator for proper adhesion. Requires two coats. Coverage rate of 1 gallon per 125 sq/ft per coat. Saves over 25% in labor compared to similar systems. Quick drying time.

Dicor CoolCoat EDPM Roof Coating option
A second option for the second part of Dicor’s 2-part roof coating is CoolCoat. CoolCoat has Ceramic MicroCells to reduce heat transfer, known as heat flux, to the coach interior by 29 percent. CoolCoat reflects and dissipates solar heat with tiny yet indestructible vacuum spheres to reduce Air Conditioner demand.
Use as your second coat after the Dicor cleaner/activator or as a third coat over the acrylic roof coating shown above.
Warning: What Not To Do
Curtis Bowen, an RV tech warns, “Guys and gals….No Flex Seal on the campers! Repeat after me or it gets the hose again….”No Flex Seal on campers.” It actually eats at the EPDM roofing and weakens it. I see this stuff cause more problems than it helps at my shop. Just buy some Dicor from eBay or Amazon if you’re not gonna hire a technician to do it.”
EPDM is synthetic rubber and not compatible with asphalt-based products. This includes aluminum roof coatings. Silicon-based caulks will not stick for long.
Henry Tropi-Cool Is Another EPDM Option
Henry Tropi-Cool is a silicone product that is okay to use on your RV’s roof. It moisture cures instead of using a solvent. My latest roof coating was Henry Tropi-Cool. See how it went on this page: Henry Tropi-Cool RV Roof Coating
TPO (Thermoplastic Polyolefin)
TPO has been used on RVs and motor homes since the 90’s. It’s cheaper and it’s already colored white. TPO sections can be welded together and is highly resistant to punctures. TPO doesn’t last as long a EPDM but it does reflect the sun’s UV rays better. It also is resistant to mold and doesn’t accumulate dirt.
Must Use The Correct Primer

Dicor’s Silicone TPO Primer is an adhesion promoter intended to aid adhesion of the Dicor Silicone Roof Coating to new and aged TPO membranes. Dicor’s TPO primer is manufactured from a fast evaporating solvent carrier and adhesive resins. A blue pigment is added to act as a color-guard so the applicator can better gauge application rates.
It’s A Two Part System

Signature Coating creates a barrier that is resistant to natural weathering, is extremely durable, breathable, watertight and weatherproof. Superior service life, adhesion strength, flexibility, reflectivity and inherent ability to stay cleaner looking makes the Dicor Signature Extended Life RV Roof Coating an excellent protective elastomeric barrier to enhance the aesthetics and renew the surface of existing RV roofs for many years.
Dicor’s Signature Coating may be used on EPDM rubber roofs and TPO roofs. Roof specific primer must be used prior to application.
Fiberglass RV Roofing
Fiberglass roofing (shown in detail below) is super durable but is heavier and more expensive than rubber roof membranes.
Here is a YouTube® video from Dicor showing how to refinish or repair your RV roof
Pay careful attention to the timing between caulking, washing, and coatings.
Replacing the entire roof membrane

If you see dark spots or bare plywood you need to act fast to save your RV.
RecPro Superflex RV Rubber Roofing is the underlay material. Order a couple feet longer than you’ll need. Watch the YouTube® video below to see how to replace the roof membrane.
It’s quite a process and needs to be done just right. Cleaning off the old caulking and membrane needs to be done well so take your time.
I recommend renting space in a barn, storage building, or under a covering so you can work in the shade and not worry about getting rained on.
This is the best YouTube® video I have ever seen on RV roof repair

Here is a kit from Lottes Roofing that has everything you’ll need to redo your RV’s roof. Click on image to see details.
Buying a kit with all the products you need saves money and ensures you get the right materials. Lottes Roofing kits are a great system to use when you need to replace the entire membrane like our friend in the video.
These materials are formulated using the best available technology and designed for long-term roof performance in all conditions.
Lottes Roofing membrane’s white reflective surface exceeds the EPA’s ENERGY STAR requirements. In comparison to other thermoplastic membranes, it resists mold growth, dirt accumulation, tears, impact and punctures. It is made to be flexible and can allow for an RV’s movement. Reinforced membranes can handle thermal expansion and contraction more effectively than other single ply roofing products.
Emergency repairs on the road
When a leak starts you need to fix it fast. Having some emergency repair products on hand will help you save your rig from damage.

Eternabond roof tape is one such product. It sticks to your roof and seals completely. It will stay sealed and can be use over or under the Dicor products.
Use a rubber roller to make a good bond.

Removing the old caulk and preparing your RV’s roof

One of the most important parts of refinishing an RV roof is removing the old caulk and sealer hopefully without damaging the roof lining. Plastic scraper tools are inexpensive and will get most of the goo off. In the picture above he’s using an oscillating cutting tool with a scraper blade on a fiberglass roof. Click on the image above to see the YouTube® video.
Here’s another good YouTube® video showing a man removing old lap sealant before applying new. He uses a heat gun and a plastic scraper to get it off.
For finish surface prep use EternaBond Eterna Clean spray. EternaClean Spray Cleaner prepares surfaces for the application of EternaBond MicroSealant tapes as well as other sealants
How to refinish or repair your RV Fiberglass Roofing

Fiberglass is a stand out product in the category of RV roofing as a material that is easy to work with, can bend quite easily without breaking, and won’t dent like aluminum or other metal roofing choices. Filon (fiberglass roofing) is a plastic roofing material that is highly durable, having a specific strength higher than certain grades of steel. This material can be used not only for roofing but repairing (or replacing and upgrading) sidewalls. Versatile, lightweight, and durable this material should be at the top of your list when you’re ready to repair your RV.
Here’s the link. Don’t forget to tell them Tiny Life Consulting sent you for a 5% discount.
![]()
Eventually fiberglass roofing will need some maintenance
Usually a good washing with soap and water is all a fiberglass roof needs, but eventually you start seeing the fiberglass threads show thru. Then you need to add a roof coat. Like a rubber roof the coating is a process. Here are the products you’ll need to bring it back to optimal performance:

Dicor Fiberglass Roof Coating System Part 1
Fiberglass Clean and Prep. To ensure proper adhesion of Dicor Fiberglass RV Roof Coating, it is essential to first prepare the surface using Dicor Fiberglass Clean & Prep, which is specifically formulated to remove all wax, oils, road grit and other contaminates on gel coat and to enhance the adhesion of the roof coating.

 Fiberglass Roof Coating System Part 2
Dicor Fiberglass RV Roof Coating protects and beautifies fiberglass and previously coated RV roofs. Fiberglass RV Roof Coating is formulated with 100% Acrylic Fiberglass resins to form a flexible coating that will expand and contract with the roof movement. Dicor Fiberglass RV Coating is brilliant white to provide a superior reflectivity thereby lowering interior temperatures.
It can be a little hard to find but click on the image for a link to Camping World to see purchase details.
As with any RV roof coating system, you must follow the directions on the container exactly to get a proper result.
Buy twice as much as you think you’ll need so you won’t try and skimp if you start running out. You want a thick coat, maybe even two coats.
Refinishing a metal roof like a skoolie
A metal roof requires an elastomeric product like this Rust-Oleum 750 Elastomeric Roof Coating.
Rust-Oleum® 750 Elastomeric Roof Coating provides a high initial reflectivity value of 84%, energy efficiency, long term durability and excellent resistance to weathering and dirt pick-up. This elastomeric roof coating is formulated to meet and/or exceed the standards established in ASTM D 6083. Rust-Oleum 750 Elastomeric Roof Coating waterproofs and weatherproofs metal roofing found on busses, and RV’s.
All surfaces must be clean and free from dirt, grease, oil, mold, algae, loose granules, loose paint, rust, excess chalk and other foreign matter which could prevent proper adhesion. Use a high pressure wash of at least 2,000 psi. Clean with Rust-Oleum Roof & Siding Cleaner, detergent or other suitable cleaner to remove all grease or oily deposits. Seams should be sealed and waterproofed and roof penetrations should be flashed prior to applying the topcoat
Bare galvanized metal does not require a primer if there is no rust present. Surface must be clean and dry. Steel surfaces must be primed, as does rusty or corroded metal. If the metal panel is not Kynar or previously coated, the surface must be cleaned of all rust as thoroughly as possible by wire brush, power tools or power washed. The surface must be primed with Rust-Oleum 110 Water-Based Rust Primer*
It has an unheard of 10 year warranty.
More pages of the Tiny Life Consulting website you’ll be interested in
Henry Tropi-Cool RV Roof Coating
How to Drain and Maintain Your RV Holding Tanks
All About Shore Power, Surge Protectors, 50 amp, 30 amp Hookups