![]()
Wiring Your Tiny Home For TV and Network
Wiring your tiny home for TV and network is not hard or expensive, but does take some forethought, a little knowledge, and the right equipment. Unfortunately, most contractors are not going to even mention wiring your house for anything other than the necessary 110 volt electricity.
Why not, you ask?
Who Needs Low Voltage Wiring?
Before you decide on just going with a wireless network, it’s important to understand that wired networks are far superior in speed and reliability. They also are not subject to local interference from appliances and other wireless devices.
Low voltage wiring systems are necessary to connect your televisions, internet, some appliances, surveillance cameras, doorbells, security systems, printers, peripherals, video games, cell phone extenders, and the like. The problem is, installing low voltage wiring costs money. It’s rarely, if ever, required by the building codes of the area. Rather than risk your panicked look at thought of adding an additional charge to your already hefty construction contract, your contractors probably just won’t mention it.
Also, they generally don’t know how to do it. They would have to hire a subcontractor, which they can do, but again, your building costs rise.
This is what I did for twenty years. I owned and operated a successful low voltage installation/home theater business before I retired. I know the tools you’ll need, the tricks of the trade, and how to run the wires yourself. As I said, it’s not hard, but it requires some knowledge and the right equipment.
As always, it pays to remember that tiny house construction is a relatively new field. It’s in your best interest to know what needs to happen. Try to know at least as much as your contractor. You’ll have a much better chance of finishing the project without the need for retrofits. Most things are eventually possible- it just might be more of a hassle.
Wiring for TV Location
If at all possible, try to include this process during the framing stage. It’s way easier to run the wires before the interior walls go up. If, for whatever reason you must do a post-build wiring job, just scroll down for helpful suggestions in our next section, If You Can’t Get Wire in the Walls.
For more information about TV reception, visit this page.
Installing the Low Voltage Wiring System in the Framing Stage of Construction
 Each TV location needs an AC outlet, a coaxial cable (RG-6 Dual Shielded) and a two network CAT-5 (or better) cables . Shown on the right is the plate I use. The parts are listed in the Amazon ad strip below. The blue and orange parts are nailed to the wall stud in the framing stage. The outlet connectors and face plate are put on after the wall is finished.
The RF Head End (RFHE)
The cables from each TV location should meet in one place we call the RF Head End. Run a matching set of cables from the RFHE to a weatherproof jack, which you’ve installed under the trailer or on an exterior wall. If you’re going with a wall, order and use a protective cover. When you and your tiny house arrive at your destination, your TV and internet provider can use this external outlet to transfer their signal through the RF Head End to the appropriate areas. This is the best method of wiring your tiny home for TV and network.
Running the cables
To run the cables through the studs, drill a 3/4″ hole about a foot above and away from any electrical wiring. You can run the coax cable and network cable together. Never run these cables with electrical wires, or thread them through the same holes the electrical wires goes through. When running parallel to electrical wires, try to keep them about a foot apart. If you need to cross electrical wires, do it at a ninety degree angle. You can snake these low-level wires through the same holes as plumbing if there is enough room, but do not run them with gas lines. 
Metal studs require grommets on each stud. These grommets, shown here, snap into the pre-made holes in the studs. The job is easier when all the holes are lined up, so keep that in mind when you’re framing.
Use low-voltage products

Do not use electrical boxes for TV and network wires. Use low-voltage brackets (shown here) for the wiring to come through the walls. This allows access to the entire wall cavity, which allows the wires to have large diameter sweeps and bends without kinking or stressing the plugs when you try and close the outlet. There are a variety of these brackets to fit the outlet location you’re working with.
Leave a couple of feet of wire sticking out of the low-voltage ring and wrap the ends in plastic wrap to keep them clean. Take care especially with pre-finished HDMI cables to keep dirt, dust, and paint out of the connectors’ tiny contacts.
If You Can’t Get the Wires in the Walls

If you are adding a TV after your walls are closed, and perhaps your exterior wall insulation is spray-in foam, you won’t be able to fish wires through your walls. In this case, a surface-mount conduit will make a neater appearance for the wires running down the wall.
This Legrand – Wiremold C210 Cord Mate II Kit- Cable Concealer On Wall Cord Cover Raceway is just what you need. It comes with double-sided sticky tape on the back, but I always stick a couple of screws in as well. Your cable will slip into the raceway and then it just snaps closed. It can be reopened if needed.
The kit shown includes 9 connector parts: 3 X 4-foot long of Raceways Cord Cover Channel, 2 X Flat Elbows, 1 X Inside Elbow, 1X Outside Elbow, 2 X Couplings and 1 X T-Fitting. It can be painted to match the wall.
I always kept these CordMate kits in stock. They can also be used for cable management by your computer desk.
Wireless Network
Yes, in a tiny house you could do your entire network wirelessly, but I still recommend hard-wiring for the fastest, most reliable network. Wire is not expensive, and pays off with better performance.
You’ll be surprised how many devices you have that can be wired to a network switch. Your TV, soundbar, streaming device, printer: all can be hard-wired. Now many of your appliances will need a network connection.
Your network switch will live at the RFHE, so make sure there is an AC outlet nearby.
Attaching the RJ-45 Modular Connector to Cat-5/6 Wire

With a wired network you’ll have a lot more connections than you expected. You might need to run 5 leads just to the TV area. You’ll get good at putting the connectors on the wire. Follow my YouTube® video on How to Install an RJ-45 modular connector.
In this video I show how to attach an RJ-45 modular network connector to an 8-strand Cat-5. It’s the same for Cat-6.
Here is an Amazon link for a 1000′ spool of Cat-6. You’ll be surprised how fast you go through the wire.
Here are tools and parts that would be good to use (not exactly what I show in the video but my tools are old and well used):
- RJ-45 Pass Thru Modular Connector
- Crimper
- Wire Stripper
- Flush Cutting Wire Cutter
- Network Cable Tester
Cameras, doorbells, and other network devices
If you plan on having a surveillance system, remember to run a network wire to camera location. Don’t forget the doorbell. Use CAT-6, as this is ready to run power to each device. Run a network wire to your work desk and your audio system location. Even some ovens, refrigerators and HVAC require a network connection. Each location must be run back to the RFHE. You can not “daisy-chain” network cable.
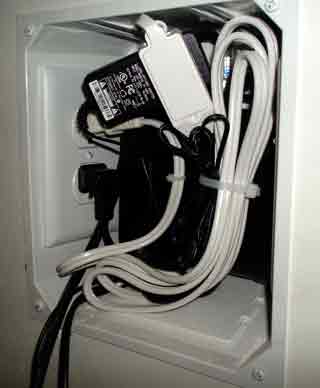
Recessed TV Wall Box
If you want your TV to hug snugly to the wall, use a Leviton 47617-REB Recessed Entertainment Box shown on the left. I wired in the AC outlet on the side, then managed to fit a cable box with its AC adapter nicely. The extension cord gave me added flexibility to position the AC adapter. You can see the TV plugged into the bottom AC outlet plug. Then I ran a short HDMI cable from the cable box to the TV.
This recessed box could also hold an AppleTV 4K. If you use an Amazon Fire TV Stick streaming media player, it connects directly into the TV input jack. The CAT-5 you ran will connect from the streaming device back to your internet provider’s modem in the RFHE.
The Tightest TV Mounting Bracket You’ll Ever Find
 For the tightest, cleanest TV install, you’ll want the PEERLESS SUF660P Ultra-Thin Wall Mount
. This wall mount installed super-easily and has just a 1/2″ gap
 between the TV and wall.
This bracket fits TV sizes 37″ to 60,” but there are other sizes to fit any TV.
Screw the mount through the wall into a stud. Never use just sheet rock mounts. If you have metal studs, prepare the area ahead of time by placing wood blocking inside the stud where the mount bolt will penetrate.
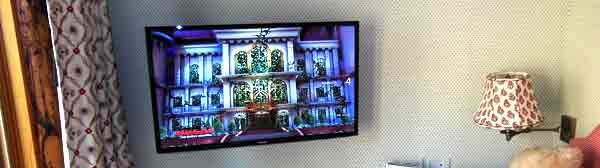
The photo on the right shows everything ready for the TV to be hung. The wires hanging out are the TV power cord, HDMI cable (from the recessed cable box), and the CAT-5 (or CAT-6) network cable.
 Here’s a picture of the TV on the mount. It’s tight to the wall with no cords showing.
The TVs I installed were Samsung Smart TVs. They had a lot of streaming services built-in.
When buying a TV always stay with a name brand.
Articulating TV Wall Mounts for Your Tiny Home

You may have need to swivel our tilt your TV into the optimal view position. The easiest way is to use articulating TV mounts. Never skimp on the bracket. Get one strong enough to hold your TV and then some. Make sure the bracket can be bolted through the wall paneling into a stud or backing more than an inch thick.
The articulating bracket shown on the right mounts to the ceiling in the loft, then comes down for TV viewing. It’s motorized and comes with a remote control.
Additional Mounting Considerations for Wiring your Tiny Home for TV and Network
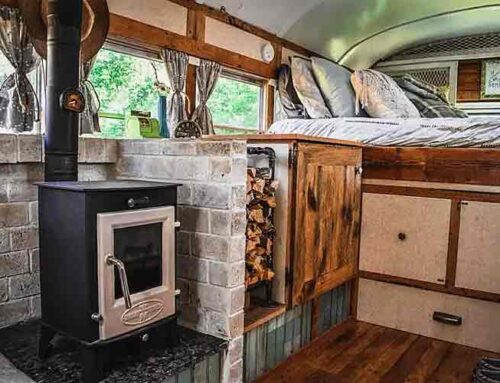
Avoid mounting your TV near a high heat source like a wood stove.
Avoid mounting your TV where it might be damaged when moving your home. I saw one TV that was smashed by a swinging chandelier.
There is a brand that makes their TVs sturdy enough to be used outside. See my page on TV types and brands.
Height
I recommend mounting the TV so you’re facing mid-screen when relaxed in your favorite chair. You want to keep your neck straight to avoid discomfort. If you wear glasses, you need to make sure that the TV is at an elevation that is in focus for the distance you are from the TV while still keeping your neck straight.
Distance:
In the early days of television, electrons radiated through the front of a picture tube to a distance of about twelve feet. Today’s TVs do not emit any radiation, so sit as close as you like.
For many, like my kids, their laptop computer serves as their TV as well. They have no provisions for anything but wireless streaming. Occasionally they connect an inexpensive projector, and show a larger picture on the wall.
Surge Protection is Vital For Protecting Tiny House TVs and Computers
Tiny house electrical systems are more susceptible to surges, micro-interruptions, and bad wiring.
RV campgrounds are very problematic. With their aging infrastructure and overtaxed distribution system, sophisticated electronics is in peril.
Water may well have seeped into underground conduits, causing the copper to corrode. This raises the resistance and causes the voltage to be dragged down.
Your home is plugged in with just a 15 or 50 amp, easily-corroded power plug. Any movement of this plug creates sparking, which causes surges and brownouts.
For more information on surge protectors visit this page: All About Shore Power, Surge Protectors, 50 amp, 30 amp Hookups
Surge damage is cumulative
You might not see damage occurring to your electronics moment by moment unless you get a massive surge. But damage from small or quick surges accumulates over time and causes your electronics to malfunction prematurely.

Your surge protector has a device that absorbs surge power. Eventually it wears out and stops protecting. Unless your surge protector has an indicator light for this, you’ll never know. Buy a good surge protector that has a light, showing that it’s protecting your equipment.
Low Voltage and Brown-Outs
This Panamax Pm8-Ex 8 AC Outlet Surge Protector is my favorite. It has 1125 Joules of protection EMI/RFI line noise filtration as well as protect or disconnect automatic voltage monitoring. You can add-on line protection modules to customize it for your needs. It comes with a $100,000 connected equipment protection policy.
This surge protector will disconnect if voltage drops below a certain voltage. If you get a surge that it can’t protect you from, it will disconnect your equipment until manually reset.
Uninterruptible Power Supply

A UPS surge protector gives you the ultimate protection against surges and brownouts. These contain batteries that keep the voltage steady. In case of a power outage, it will power your equipment long enough for you to properly shut it down.
You can find some UPS devices that will shut down your device for you, and trigger a backup too. But these get expensive and need to be set up properly. The APC UPS, 1500VA UPS Battery Backup & Surge Protector with AVR, Back-UPS Pro Uninterruptible Power Supply (BX1500M) automatically regulates Voltage (AVR). An AVR UPS Battery Back up instantly corrects low/high voltage fluctuations.
Keep Your Receipts
Keep the sales receipts for everything you buy. Many of these surge protectors come with insurance in the event your equipment gets damaged while plugged into their protector. Some even cover lightning damage. I’ve seen this pay off big time.
Nothing protects against a close lightning strike, so the insurance will replace any equipment that was damaged. I used this a few times for my clients and there was never any hassle. Filled out the paperwork and got a check.
Here are some other pages of the Tiny Life Consulting website you’ll be interested in

Plastic Romex Staples hold wires against the studs.


Leave A Comment