
People are starting to winterize their RVs and travel trailers already so I wanted to get this out there. I love camping in the fall, so for now I’m only going to blow out my water lines. I’ll just take some water in my 5-gal work thermos like the one shown here.
How I Winterize My RV
Every “do-it-yourself” RV owner has their own particular way they winterize their camper. It’s like cooking. You adjust the recipe to fit what you like and what you can do as long as the main goal is achieved. The goal is to protect your toy from freezing temperatures, sun damage, and other damaging environmental factors.
Empty Your Holding Tanks and Add Antifreeze
Empty your holding tanks and rinse well. Add your normal deodorizer and 1/2 gallon 50/50 mix of antifreeze/water to the black water tank. Pour a little antifreeze down each of the sink drains so the P-trap doesn’t freeze. Don’t forget the washing machine drain (if you have one) and a possible floor drain. Enough antifreeze should get into the gray water holding tanks to keep it from freezing too.

Fill the gas tank
To prevent the gas tank from rusting, fill the tank just prior to parking. Add Sta-bil Storage Fuel Stabilizer to keep the gas fresh until spring. I usually add the Sta-Bil then fill the tank and drive it home. This gets the Sta-Bil mixed with the fuel and also runs stabilized gas into the fuel line and carburetor.
Run your on-board generator, if you have one, to get the stabilized gas into its fuel line and carburetor as well.
Propane tank
You do not need to fill your propane tank. It will not rust. Just close the main valve(s) tight.
Just FYI: August is the best month to fill your propane tank as the prices are cheapest.
Find a Safe Parking Spot
My dad used to keep his travel trailer in an old barn. It was out of the elements but usually ended up covered in bird poop by spring. Many other creatures would also love to make themselves at home in your rig for the winter. If you can’t find or afford a safe under-roof storage area, make sure your camper is parked on a solid surface.
If you are going to park it in a weedy field, trim the weeds down to the ground.
Put chocks behind the tires and snap a lock on the trailer hitch.
Deploy a Rodent Deterrent

One friend just backed his travel trailer into the weeds. By spring the trailer was infested with mice. It will be harder for rodents to access your RV if it’s on a solid, weed-free pad. I keep mine in the driveway but also add some Tom-Cat blocks in a few places like under the sink, sofa, and in the storage compartment.
Look under your camper. Plug any holes with steel wool and caulking to keep the pests out.
Set out pouches of Fresh Cab Rodent Repellent. Made with balsam fir oil, this plant-based alternative freshens and protects our storage areas for up to 90 days. Made in the USA by EarthKind, the only company to develop a botanical rodent repellent that meets federal EPA standards for professional pest control use/effectiveness in indoor/enclosed areas.
Major Rodent Problem Solver:
This Flip-N-Slide Bucket Trap catches rodents one after another. Automatically resets and holds upwards of 30 mice and 10+ medium sized rats unlike conventional traps which only catch one or two.
No mess that you must clean up afterwards. Simply release or dump your friendly intruders outside (far away from your house preferably). Reusable: The Flip N’ Slide is not a one-and-done throwaway product. You can use our trap repeatedly without having to toss it out.
Press play to see Flip-N-Slide mouse trap in action.
The trap can be humane if you have a problem with killing rodents, but you also can add water to the bottom of the trap to make sure they die. Because there is no poison involved you can leave the dead mice in a field as feed for birds and larger scavengers.
Wives’ tales. What works and what doesn’t:

As silly as this sounds, we throw a rubber snake under the vehicle. We learned that from parking the car at an off-site airport parking area that had rodents (mice, rats, porcupines, possums) chewing up the wires in the parked cars. What do ya know -it works.
What doesn’t work:
Irish Spring soap. Nope. Mice will actually eat it.
Dryer Sheets. Nope. Mice will make bedding out of it.
Moth Balls. Definitely not. These can turn your RV or tiny house into a toxic waste site and render it uninhabitable.
Get the weight off the wheels?
There is always much lively discussion within RV circles about getting the weight off your tires for the winter.
 There are some good reasons why you should if you can.
When your tires sit in the same position for months at a time the steel belts within the tire can be moved out of place. This could result in a premature blowout later on. The tire can also develop a permanent flat spot causing a vibration when towing.
With my small pop-up camper I could easily get the weight off the tires by lowering the front, putting cement blocks under the frame in the rear, then raising the front and putting blocks under the front corners. The wheels would actually come off the ground. This would not be a simple or easy process with my current RV so I have never done it. So far, no ill effects.
A tire cradle will support the tire so it doesn’t get a flat spot. These are great for heavy RV and travel trailers that can’t easily be jacked up.
Cover the Tires
Protect the tires from the sun with UV rated tire covers. This is an all-the-time thing whenever your RV is sitting for more than a few days. It will really make a difference in how long the tires last.
See more about RV tire care on this page: Tires for your RV.
Should your RV or travel trailer be level?
Again, people advise yes and no. Mine is on a slight incline which actually helps water drain off the roof. It is level as far as left and right go. I think that is good so there’s not excessive weight on either the right or left side tires.
Winterizing your RV or Travel Trailer Water Lines
We are all aware of the danger of freezing water pipes. Water expands when it freezes. This will crack pipes and fixtures making for a nasty surprise when it thaws.
If you don’t need to be concerned about freezing you can just drain the tanks and lines. Next time you use your camper add a little Clorox to the holding tank and flush the lines well before using again. But if there is even a chance of a hard freeze during the storage time do this:
First: Drain the water
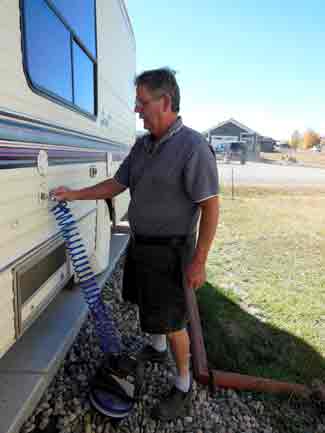
First, drain the water from the lines, fresh water holding tank the water heater. My Class C RV has a pretty simple water system but every RV and travel trailer should be equipped with the appropriate drain valves. My driveway is on a slight incline so this helps send all the water to the drains. The camper has a drain valve to drain the fresh water tank and one to drain the city water lines. They may be in a different compartment than the water tank. You might need to do some looking for the drain valves in your rig.
 Open every faucet in the sinks, shower, and the pressure relief valve on the water heater to help the draining process.
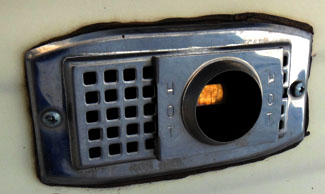
Don’t forget to drain the water heater
The water heater pressure relief valve looks like this photo. It’s located on the water heater. By bending the metal lever to the straight out position you will allow air into the tank and cause it to drain. Expect five or six gallons of water to drain out thru the intake line to the nearest drain valve.
The water heater drain valve in my camper is under the kitchen sink. One drain for hot and one for the cold water line.
This will get 95% of the water out of your system but that last little bit has to go too or it will make for a big headache next spring.
If your water heater is equipped with an anode rod unscrew it to drain the water then use a compressor to blow the remaining droplets out.
Tankless water heaters:
Tankless water heaters can retain just a bit of water. It’s enough to damage the unit if it freezes. The tankless water heaters I recommend on this page have a drain plug to winterize them.
Water Filters
Remove any water filters. Some folks recommend draining the water out and putting them in the freezer to keep fresh for next season but If it’s not too expensive it’s a good time to replace the cartridges.
I NEVER ADD ANTIFREEZE to my the fresh water lines. Here’s why:

$3.79 at Tractor Supply
Many, maybe most, “experts” insist that you add antifreeze to your fresh water lines. The Camping World blog quietly mentions that you need to “remove and bypass your water filters”, then “bypass the water heater.” You really don’t want the water heater and filters gummed up with antifreeze. But they must just assume we are all plumbers and can (or want) to do things like “bypass.” I hate plumbing. If it’s more than opening and closing valves…not gonna happen.
Many years ago I did add the pink RV antifreeze to my pop-up camper’s water lines. The water lines were clear plastic so I could see the pink liquid in it. By spring the lines were filled with a black fuzzy substance (algae) and totally blocked. I don’t know what happened but I wasn’t about to try and clean it or replace all the plumbing. It was a perfect time for us to buy an RV so we sold it as-is and I swore never to add anti-freeze again.
RV anti-freeze is a chemical generally regarded as safe by the Food and Drug Administration. The one shown here is Ethanol, a known carcinogen, and often in alcoholic beverages. The pinker kind is propylene glycol, a food additive. It’s a little safer to ingest but creates a perfect environment for contaminants (like algae) to grow.
If you end up later with low water pressure or a nasty smell in your fresh water system see my page: Caring For Your Freshwater System
Now I blow the water out of the lines.
![]()
I bought a small compressor and an adapter fitting to simply blow the water out of the lines. It works fine.

 Using the brass blow-out plug
Screw the “brass blow-out plug” (shown above) into the city water inlet to change it over to a valve like you find on a tire. The compressor comes with the mating air chuck. While the compressor is charging, close all of the faucets in the camper except one. When you shoot the compressed air into the city water inlet, the air will blow the water out the one faucet you left open. Repeat the process with each faucet and drain valve. Expect to see a little moisture come out of each faucet and valve.
Don’t forget to blow down your outside shower, and, your toilet’s flush valve!
I use a filter on the compressor to prevent introducing any contaminants like rust or moisture from the compressor tank.
Once you’ve blown all the water out open all the faucets and valves for the winter. The fresh water holding tank may have a little water in it ( like 1/4″). This is fine. Freezing shouldn’t damage the fresh water tank.
Don’t forget the outside shower and kitchen faucets if you have those.
Winterizing an internal RV water filter
 If you have a fixed mounted internal water filter system remove and discard the filters and drain the housings. Reinstall the empty and dry filter housings.
Replace cartridges with fresh ones in the Spring. Never run anti-freeze through the filter system.
For details on fresh water filter systems see this page of the Tiny Life Consulting website: Caring For Your Fresh water System
YouTube® Instruction Video
See my YouTube® How-to video the see exactly how to blow out the water lines.
Permanently Installed Air Flushing System

The blow-out process can be labor-intensive when you have to haul a compressor out to your RV and climb in and out at least ten times, opening and closing the valves. A permanent and easier solution is to install this Lippert Components Floë 809127 Induratec 12V Integrated Water Drain Down System for RVs.
Whenever you want to blow out your water lines you simply drain the water tanks and hot water heater as described above. Turn on this small compressor and open each faucet one by one. Then just turn it off and you are done.
There is a 110 volt unit as well.
Winterizing RV Appliances
My RV doesn’t have any appliances to speak of, but yours might. An appliance like a portable ice maker should be brought inside to prevent freezing.
Winterizing your washing machine
If you have a washing machine read the owners manual to get the proper winterizing information. Washing machines have residual water in the pumps and hoses that may freeze and damage the pipes in cold weather. Some have a drain plug that will help you get the final drips of water out. LG has a water filter that needs to be opened then the washing machine tilted back 6 inches to get all the water out. LG recommends adding an entire gallon of anti-freeze and running the spin cycle for a few minutes.
Dishwashers are similar: Disconnect the water line; add anti-freeze; run a short wash cycle.
Winterizing a residential refrigerator in an RV
If your refrigerator has a built-in ice maker you need to get all of the water and ice removed. Here is a good YouTube® video showing how to do that.
Should I remove my LED TV for the winter?
VIZIO says the safe storing temperature of their TV’s is -5° to 120°. So, check the lowest temperatures of your area in winter to decide if you should bring your LED TV inside.
Other Things I Take Inside For The Winter
Remove any food, spices, cooking oil etc. from the pantry that will go bad over the winter.
Bring foam mattress covers inside. Most mattress covers will deteriorate from the wide temperature swings experienced in storage. Good latex foam is designed for this. See good foam mattresses on this page: Best RV and Tiny House Mattresses
As long as it stays dry other bedding can stay in the RV.
Everything Else in the RV Winterizing Process is Fairly Easy
Disconnect the accessory battery (batteries)

There is always a tiny parasitic drain occurring to the batteries even when everything is turned off. Internal damage will be caused if the battery is discharged too far. To prevent damage, disconnect the wires from the battery terminals, both positive and negative. Some RVs have a battery disconnect switch built in for this. Mark them if you need to so you can connect them in the exact way next spring. I leave mine in place all winter but most advisors insist the battery be removed and stored in the garage or basement where it won’t freeze.
Some also recommend a “battery tender” that keeps the battery at a full charge but not overcharged. If I had some very expensive batteries, I would do all I could to keep them in good shape to avoid the replacement expense. But a deep-cycle, lead/acid battery from Walmart is under a hundred dollars and my battery lasts about three years no matter what I do.
I do not disconnect the starting battery in my RV because I usually start the engine every couple months and run for 30 minutes. If the starting battery goes dead in just a couple months you may need a new one as it should be able to hold a charge for at least that long.
Lithium-ion batteries are a little more fussy
Lithium-Ion batteries should never be charged when the temps are below freezing. I would take a bit more care with them. Since they are much lighter weight than a lead/acid battery remove them to a temperature controlled storage area like a heated garage.
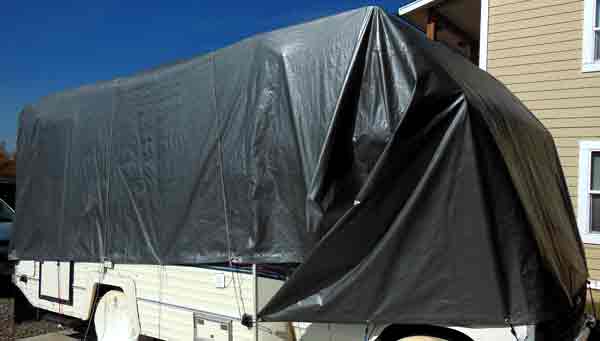
Covering Your Rig for the Winter
Cover your rig to keep it clean and limit sun damage. Always cover the tires as well. See tire covers in the widget section of this page.
Custom RV Covers can be expensive but they are easy to drape and secure over your RV. They usually have a zippered opening to allow access to the door too. In the Colorado climate where I live these covers only lasted a few years before becoming quite tattered.
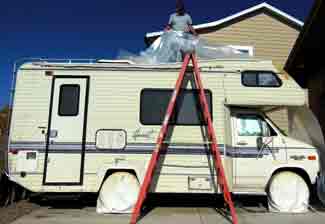
Spreading a 4 mill sheet of plastic first. Use caution as it can be very slippery and be careful of stepping on vents.
The tops are several layers thick and supposedly waterproof. The sides are breathable with air vents so moisture is not trapped underneath. These cost between $200 and $450.00.
After burning thru several custom RV covers I now just use a 16 mil heavy-duty poly tarp with a sheet of plastic underneath. I secure it with bungee cords and rope. I throw the rope over the top of the tarp to prevent billowing in the wind. This has been working well for me.
Brush the snow off if it’s get more than about a foot deep. Don’t let the snow pack down to ice.

Raising the tarp a bit
Water pooled at the rear of the camper’s roof where the tarp drapes over the railing. I shaped a piece of 3″ thick foam insulation to fit around the vents and air-conditioner. The foam is 4′ wide and 8′ long. It raises the tarp in the lowest corner so the moisture runs off the other side.
Cover your heater exhaust port
Make sure rain and snow are not allowed to enter the heater exhaust port or the fire box will rust thru and you’ll be replacing your heater in the spring. Cover it loosely so any moisture that does get in, or condenses inside, can escape.
I use a tarp big enough to drape down the side of the RV and cover this port.
This year, since I had just sprayed the dirt off my rig at the car wash, I ran the heater for a few minutes to make sure the inside was completely dry and, of course, let it cool before putting on the tarp.
Dealing with moisture buildup inside
In Colorado the air can be dryer than the Mojave desert, so I really don’t need to deal with moisture buildup during storage. But in the Northeast part of the U.S., humidity can be an real issue. Mold can grow especially under mattresses and sinks. Many people recommend the Rainer, DRI-Z Air Pot (shown in the widget section) chemical dehumidifier to deal with excess humidity during storage.
Adding an electric dehumidifier
The custom RV covers cover only the top with a waterproof layer but the sides allow air and moisture to pass. Some of these covers also have vents. If the chemical dehumidifiers are not enough to deal with the humidity in your area you might consider running an electric dehumidifier. Set it on the kitchen counter and run a drain hose into the sink. You’ll need to run power to it too (if you can), and check the gray water tank to make sure it doesn’t fill up. This should work but it needs to run continuously all winter, which means you have to check the system regularly.
What else do you do?
Anything I forgot, like remove food items from the pantry? Leave your comments below.
Other pages of Tiny Life Consulting you’ll be interested in:
RV Winter Living How to prepare
Dealing with Moisture in an RV
Skirting for Tiny Houses Travel Trailers RVs
How to Drain and Maintain Your RV Holding Tanks
How to Empty Holding Tanks Remotely

How do you remove the water in the line between the water tank and the pump and the water between the pump and the faucets without damaging the pump.
With my old beast the water pump and tank gravity drains fine. The city water line, where I connect the compressor is just on the other side of the pump so it doesn’t seem to impact it.