Using Reclaimed Pallets for a Pinterest® Project

After three days of hard labor this is what I have. My wife is skeptical that it will ever look better than a pile of junk.
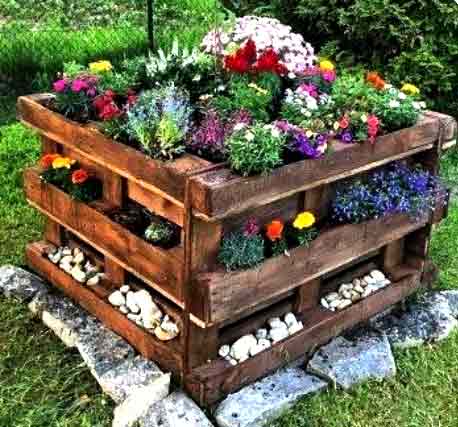
Here is my real-life experience using reclaimed pallets to make a Pinterest® project. Pinterest® has me believing I can make a cute flower planter box out of old wood pallets, for cheap, and it will look like the picture above.
Is Using Reclaimed Pallets realistic?
I have the perfect bare spot in my front yard for something this size, so I’ll give it a shot. The neighbor is pretty excited to watch my flower planter take shape because she wants to do the same thing. My wife thinks it looks more like a pile of junk.
I assumed perfect pallets would be free
I collected six pallets from my local lumber store. These free pallets are very dirty and have been repaired several times. There was a stack of pallets in better condition for sale at $15.00 each.
My first unrealistic expectation was to find perfect, clean pallets for free. I did see an ad for free pallets from an outdoor toy (snowmobiles, etc.) store in the next town over, but that is 60 miles away. Maybe you can find nice ones near you.
I thought it would be easy

I wish I had know about this pallet buster.
Pallet wood is hard. It was everything I could do using a pry-bar and hammer to get the boards separated and still be in one piece, They split (or shattered) easily. In hind sight, it would have been easier to just cut them apart.
The recovered pieces of wood are not even close to uniform in size. There are many different styles of pallet construction. Luckily, I got two matching sets so the planter was roughly square.
I used every power saw I owned (5) to get the planter bases shaped properly. I needed to make twenty small planter areas in all. Every one was different. Notice the inside shelf made from pallet parts about a foot below the top. This will be the main planting area.
I used my cordless nail gun to tack in all of the tiny support pieces.
Reclaimed pallets are way dirtier than I thought they would be
Even power-washed, the reclaimed pallets were filthy and showed the stains and corrosion of every load they had carried. I should have worn gloves as I got many painful splinters.
I’m hoping a dark stain, like the Pinterest® photo shows, will hide the stains. My wife wants the color to match the house, but stain is $54.00/gal! I bought a can of “miss-tint” for $10.00 and will attempt to create the right color by adding left over paint I already have.
Pallets are frequently coated with dangerous chemicals
Look for these markings to see if pallets are dangerous to use:
- HT: Heat Treated. Pallets have been heated to kill pests, fungus, and mold. Pallets marked with HT are OK to use for DIY projects.
- MB: Bromide Fumigation: Wood is treated with methyl bromide gas for pest control. It is an ozone depleting substance, highly toxic.
- (CT or KD): Chemical Pressure Impregnation. Wood is treated with preservatives under pressure. There are several chemicals used. All are dangerous pesticides.
There are no plans to follow
There are no plans attached to the Pinterest® picture. When you click through to the associated website, you are taken to furniture ads. So, you’ll need to design on the fly.
I considered buying two plastic tubs ($20.00) for the top but instead used two layers of 4 mil plastic sheeting stapled in place to form a good deep planter box. Next, I added a layer of pea pebbles to the bottom of the planter, and drilled a 3/4″ hole in the lowest spot to provide drainage. Four bags of potting soil should be enough to fill all the flower pot areas.
Drip Watering System
I added a drip system for watering because the planter areas around the outside are pretty small and will dry out quickly. You can see the 3/4″ main line installed around the middle. I simply had to pop drippers in the right places. I used a 1/4″ line for the top row. To install the drippers, I needed to cut the line and install a “T” and add a short peace of tubing with the dripper on the end. I put several sprinklers into the top box because it will need more water than the smaller side plant boxes. Lastly, I stapled the tubing into place.

Buy a complete system so you have everything you need to begin with.

Add a timer to water automatically at night.

Always use regulated drippers,
If I had been thinking I would have added some black plastic sheeting around the inside to block the view of the empty interior. I added the rocks around the bottom because that’s what we have around here.
Finally Planted

At our elevation (7500′) we can’t plant annuals until Fathers Day. Even then it’s a little risky. I did get some flowers in, but there have been several nights that I had to cover it to keep from freezing.
Snapdragons, petunias, peas, and a few unmarked plants completed the project. Walmart had their slightly frost-damaged flower on sale. I just pinched of the old blooms and they will get more flowers eventually.
Now we just need time and lots of water.
Mid-August
Mid-August is getting to the end of our growing season.
I fought off frost, hungry deer, and drought, and this is it. Not exactly what I was hoping for, given the image I found on Pinterest. Even with copious fertilizer and water, the Colorado sun just cooks things alive.
Lesson Learned
Yet again I learned that things aren’t going to turn out like I thought. But they did turn out. So don’t worry, be happy.
I did learn that snapdragons and marigolds do very well in this hot, dry climate, so the next year I created a rock garden.
Success!
I was even able to plant tulips, daffodils, and crocus for an early burst of spring color, with the snapdragons and marigolds brightening our summer.

Leave A Comment