Melted RV Shore-Power Plug: How to Avoid Tragedy
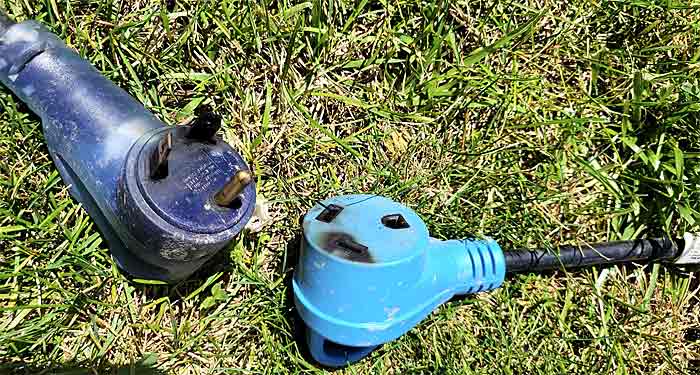
Melted RV shore-power plugs happen far more often than you would imagine. The sight of a melted plug is, at the very, least alarming and, at worst, can cause a fire. Preventing a melted RV shore-power plug is easy and simple. Normally, only two common conditions will melt your plug, and we’ll tackle both of them so you can prevent what could be a frightening and dangerous situation.
The Causes Of Melted RV Shore Power Plugs
RV shore-power plugs melt due to corrosion and loose connections. Removing corrosion is an easy fix if you catch it in time. Loose connections frequently stem from overheating/overloading your wires and connectors. Understanding the safe operation of your electricity draw and having the proper equipment can save your system from poor connections and the subsequent complications.
Corrosion: It Happens In All Climates, But Frequently Goes Unnoticed
Corrosion happens, but depending upon the climate, some is more visible than others.
If you’re near the ocean, a thick layer of corrosion on metal plug prongs can develop quickly and screams for attention. Where I live in Colorado, a dull layer of almost invisible corrosion can also develop rapidly, and can be even more dangerous because it’s barely noticeable.
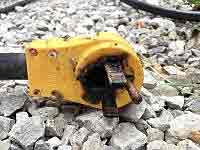
How Corrosion Can Start a Fire
When RV extension cords, adapters, and surge protectors are connected the act of the two sides of the connector surface area coming together usually scratches though any corrosion and makes a surface small connection. However, the poor connection means that all of the electrons are coursing through a smaller area than intended. The result is heat.
RVs frequently draw close to the maximum amperage supplied by the source, especially in summer when air conditioners are running or in winter when the electric heaters are running. 50 amps is a lot of power.
This Fix is Simple: Clean the Corrosion
It’s that easy. Keep your connectors shiny clean and you’ll avoid this serious problem.
Rub the prongs on the male plug with fine grit sandpaper or steel wool.
You probably won’t need to clean a female outlet on the RV parks electrical pedestal since the park owners are responsible for keeping the connector on their pedestal clean. However, if you have an RV outlet installed at your home or you are using your own 30 or 50 Amp RV extension cord, you might need to clean the receptacle end occasionally.
Since this part of the process is a little more difficult, you’ll need the right tool to get in there and effect the cleaning.
Turn the Power Off Before Cleaning
I use a metal contact cleaner file to clean the outlets recessed female terminals. Make sure the power is off before inserting anything into an outlet.
Spray contact cleaner into the socket, then work the cleaner file in and out to loosen the corrosion. Spray contact cleaner in again to dislodge and remove the loosened corrosion, allowing it to rinse out.
Drawing Power: Heating and Cooling Over Time Loosens the Connection
While corrosion and loose-fitting connections are most often the problem, using an extension cord that is too light and/or drawing near the maximum current causes the wires and connectors to heat up and cool down, expanding and contracting them repeatedly, damaging them over time and causing a loose fit. This is most frequently a problem for RVs that use 30 amps.
Be mindful of how much current you’re using. For example, if the A/C is running, turn it off before using the microwave oven, as both appliances draw a significant amount of power.
Replacing a Burned or Melted RV Shore Power Plug
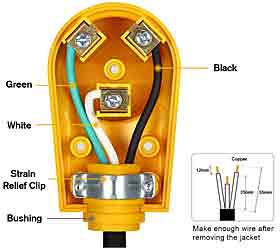
Replacing a damaged RV shore power plug is easy and straightforward. The plug is relatively large, so you have plenty of room to route the wires.
Cut back the black outside rubber insulation of the power cord to expose enough non-burned inner wires as shown. Cut off the burned and melted wire.
Insert the cable into the plug until the outer jacket is completely under the metal clamp. Tighten the clamp screws securely.
Strip the insulation off the inner wires about 1/2″ to expose the shiny copper wire. Twist the wire strands together.
Loosen the three terminal clamps and slip only the exposed copper wire under each clamp. Ensure every strand get under the clamp no strands touch any other terminal. Follow the color code like the diagram shows with the plug you buy.
Replace the outer cover and tighten the three screws that hold it. That’s it. You’re done!
Cleaning an RV Trailer Connector
Corrosion on your 7-pin trailer connector can cause intermittent loss of turn signals and brake lights on your trailer or TOAD.
There are several types of connectors in use.
Cleaning the 7-Pin Round Style RV Trailer Connector
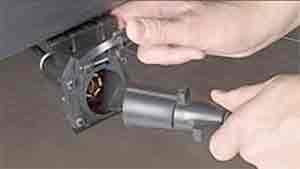
Cleaning the seven-pin round-style RV trailer plug is very similar to cleaning the shore-power plug described above.
Getting to the smaller terminals is always the tricky part. A terminal cleaning tool or ignition point file is handy to have.
Cleaning and Repairing a Seven-Pin Molex Connector
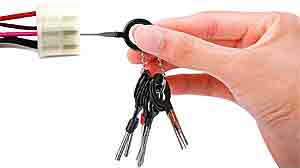
Cleaning a Molex connector can be difficult if your trail has one. Lucky for us someone already invented a cleaning tool. The picture is actually a terminal removal tool but it’s perfect for getting in there and scratching the corrosion off the tiny terminals. You could also use the tool to remove the pin, clean it, and reinsert the pin into the nylon housing if it’s extremely corroded.
Apply a quick squirt of contact cleaner. Scratch and spray the surface until the tiny pins are clean and shiny. Finish with a quick spray of corrosion inhibitor. This will prevent or delay further corrosion.
Another easy method of cleaning the recessed connectors is to spray with contact cleaner, then plug and unplug them several times.
If the connectors pins are really corroded and need to be replaced, it’s easy now that you have the extraction tool.
Corrosion In Your RV Power Center
Are your lights flickering? Is the fan in your power center running constantly? Are your circuit breakers popping? Do you smell something getting hot?
Check you RV’s power center for loose and corroded wires and connectors.
In this video, by Mr. Rchitty, He shows what happens when excessive current draw overheated the buss bar and cause oxidation of the connectors. This power center was on the way to a catastrophic failure which could have burned down the RV.
I replaced my power center too. Here’s how it went.
Unplug your RV from the power pedestal (or generator) and let it discharge for about 20 minutes. Also, disconnect your house batteries in case a secondary load center is fed through an inverter. Then, removing the circuit breakers and cleaning the contacts and connectors is safe.
Corrosion Is Going To Happen
Add checking for corrosion to your list of to-do items during your Spring de-winterizing. Check the battery terminals and clean if needed. Clean the shore power plug even if you can’t see any corrosion. Open your power center and, using a flashlight, look closely at the connections. Clean or replace if needed.
At the very least your electrical equipment, like the air conditioner, will run better.
You could save yourself a catastrophe.
More pages of the Tiny Life Consulting website you’ll enjoy
All About Shore Power, Surge Protectors, 50 amp, 30 amp Hookups
Running RV Appliances Like Air Conditioners Off-Grid
Wiring Your Tiny Home for TV and Network
Generators or Portable Power Centers: Which One is Right for You?





Thank you much. It was very helpful.
So very helpful! Thank you.
So I’m finding there is a lot of different manufacturers that say do not put Dielectric Grease On the connectors. That actually can cause a problem.
Why do you say to do it?
I agree with them and have removed that from the page. The dielectric grease should be used as a sealant on non-conductive areas to seal out moisture. I’ve seen it used on the contacts of an electrical connector to make it easier to plug and unplug. Hopefully in this case the contact scrapes the dielectric off the metal prongs and it goes together allowing the metal areas to make a better connection but I’m rethinking that. The contacts need to be clean and make the best connection it can to allow the electrons to flow freely.